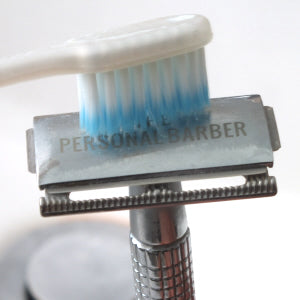
To clean a safety razor, rinse it thoroughly under warm water to remove any hair and debris, then use a toothbrush and mild soap to clean the razor head and handle. Afterward, dry the razor well and store it in a clean and safe place.
Keeping your safety razor clean is essential for maintaining its performance and prolonging its lifespan. Proper cleaning helps to remove any built-up residue or bacteria that may be present on the razor. We will guide you through the process of cleaning your safety razor to ensure optimal hygiene and functionality.
Regular cleaning is a simple and effective way to keep your safety razor in top condition. By following a few easy steps, you can ensure that your razor remains clean and ready for your next shave. Let’s dive into the details of how to clean a safety razor properly.

Credit: www.thepersonalbarber.com
Why It’S Important To Clean Your Safety Razor
Regularly cleaning your safety razor is crucial to maintaining its performance and longevity. With proper care and maintenance, you can ensure a close and irritation-free shave every time. Learn how to effectively clean your safety razor to keep it in optimal condition.
Regularly cleaning your safety razor is not just a quick task you can skip. It plays a crucial role in maintaining the razor’s hygiene, durability, and performance. By keeping your safety razor clean, you can benefit from the following:
- Prevents bacterial growth: A clean safety razor prevents the accumulation of bacteria, dirt, and dead skin cells. This helps reduce the risk of infection and skin irritations, ensuring a safer shaving experience.
- Extends the lifespan of the razor: Cleaning your safety razor regularly removes any buildup of soap scum, oils, and hair. By preventing these particles from clogging the razor, you can prolong its lifespan and maintain its overall effectiveness.
- Ensures a closer and smoother shave: When a safety razor is not cleaned, residue can accumulate between the blades and affect their performance. Cleaning your razor ensures that it remains sharp and free of debris, allowing for a closer and smoother shave.
By regularly cleaning your safety razor, you can enjoy a more hygienic, long-lasting, and efficient shaving experience. Take the time to properly clean your razor after each use to experience these benefits firsthand.
Tools And Materials Needed
To clean a safety razor, you’ll need a few essential tools and materials. Grab a toothbrush, dish soap, warm water, a soft cloth, and rubbing alcohol for an effective and thorough cleaning.
To keep your safety razor clean and well-maintained, you’ll need a few essential tools and materials. Here’s everything you’ll need to get started:
- Bowl or sink: A bowl or sink will be necessary to hold the warm water during the cleaning process.
- Warm water: Fill the bowl or sink with warm water to ensure effective cleaning.
- Mild soap or shampoo: Use a gentle, mild soap or shampoo to avoid damaging the razor’s components.
- Toothbrush or soft-bristled brush: A toothbrush or soft-bristled brush will be handy to remove any debris or residue that may have accumulated on the razor.
- Rubbing alcohol or hydrogen peroxide: To sanitize the razor thoroughly, have rubbing alcohol or hydrogen peroxide on hand.
- Towel or cloth: Finally, keep a towel or cloth nearby to dry the razor after cleaning.
By gathering these tools and materials, you’ll be well-equipped to clean and maintain your safety razor, ensuring its longevity and optimal performance.
Step-By-Step Guide To Cleaning A Safety Razor
Cleaning a safety razor is easy with this step-by-step guide. Keep your razor in tip-top condition by following these simple instructions.
Step 1: Disassemble The Razor
- Take apart the safety razor by unscrewing the handle from the head.
- Gently separate the razor head from the bottom plate.
- Remove the blade from the razor head.
Step 2: Rinse The Razor In Warm Water
- Hold the disassembled parts of the razor under warm running water.
- Make sure to rinse away any excess shaving cream, hair, or debris.
- Ensure that all the parts are thoroughly wetted.
Step 3: Apply Soap Or Shampoo To The Razor Head
- Using your finger or a soft brush, apply a small amount of soap or shampoo to the razor head.
- This will help to remove any oils, residue, or bacteria on the razor head.
- Gently rub the soap or shampoo all over the razor head.
Step 4: Scrub The Razor Head With A Toothbrush
- Take a clean toothbrush and gently scrub the razor head.
- Make sure to reach all the nooks and crannies of the razor head.
- The toothbrush will help to remove any stubborn buildup.
Step 5: Clean The Razor Handle
- While cleaning the razor head, don’t forget to clean the razor handle as well.
- Use warm water and a cloth or toothbrush to scrub away any dirt or residue.
- Pay attention to the handle’s grooves and crevices.
Step 6: Rinse The Razor Thoroughly
- Rinse all the razor parts under warm running water again.
- Ensure that no soap or shampoo residue remains on any part of the razor.
- Give the parts a thorough rinse to remove any remaining debris.
Step 7: Disinfect The Razor With Rubbing Alcohol Or Hydrogen Peroxide
- Moisten a cotton ball or pad with rubbing alcohol or hydrogen peroxide.
- Gently wipe down the razor head, handle, and all the parts to disinfect them.
- This step helps to kill any lingering bacteria or germs.
Step 8: Dry The Razor Completely
- After disinfection, use a clean towel or cloth to dry all the razor parts completely.
- Make sure to dry each part individually, ensuring there is no moisture left.
- Proper drying prevents rusting and extends the razor’s lifespan.
By following these step-by-step instructions, you can effectively clean your safety razor, keeping it in optimal condition for a close and safe shave. Remember to perform regular cleaning to maintain hygiene and prevent any blade clogging.
Tips For Maintaining A Clean Safety Razor
Maintaining a clean safety razor is essential for a close and hygienic shave. Follow these tips to keep your razor in top shape: rinse it thoroughly after each use, soak it in rubbing alcohol, scrub it gently with a toothbrush, and store it in a dry place.
Properly maintaining your safety razor is essential to ensure it stays clean, functional, and safe to use. By following a few simple tips, you can extend the lifespan of your razor and enjoy a comfortable shaving experience. Here’s how to keep your safety razor in top-notch condition:
Clean The Razor After Every Use:
- Rinse the razor thoroughly with warm water to remove any hair and shaving cream residue.
- Use a soft toothbrush to clean between the blades and unclog any debris.
- Regularly check the razor head for trapped hair or gunk, and remove it carefully.
- Dry the razor with a towel or let it air dry to prevent moisture buildup.
Use A Toothbrush To Remove Stubborn Residue:
- For stubborn residue or mineral buildup, gently scrub the razor with a toothbrush soaked in warm water.
- Do not use abrasive cleaners or harsh chemicals, as they can damage the razor’s finish.
- Avoid using excessive force or applying pressure that could bend or break the razor.
Store The Razor In A Dry Place:
- After cleaning, store your safety razor in a dry area to avoid rust or corrosion.
- Consider using a dedicated razor stand or holder to keep it upright and prevent damage.
- Avoid placing the razor in a damp bathroom where it may be exposed to moisture.
Replace The Blade When It Starts To Dull:
- Dull blades can lead to irritation and a less effective shave.
- Pay attention to any tugging or discomfort during shaving, as it may be a sign that it’s time for a blade replacement.
- Follow the manufacturer’s guidelines for blade replacement frequency and disposal.
By following these tips, you can ensure that your safety razor remains clean, sharp, and ready for a smooth shave. Maintaining a clean razor not only prolongs its lifespan but also helps to reduce the risk of skin irritation and infection.
So, make it a habit to clean your safety razor after every use, use a toothbrush for stubborn residue, avoid harsh chemicals, store it in a dry place, and replace the blade when necessary. It’s these simple steps that will keep your safety razor in optimal condition for many shaves to come.
Enjoy a clean and comfortable shaving experience!
Frequently Asked Questions Of How To Clean A Safety Razor
How Do You Clean A Dirty Safety Razor?
To clean a dirty safety razor, rinse it under running water, use a toothbrush to remove debris, and soak it in a mixture of warm water and white vinegar.
Can I Clean A Safety Razor With Alcohol?
Yes, you can clean a safety razor with alcohol.
How Do You Clean A Used Safety Razor?
To clean a used safety razor, rinse it under warm water, use a toothbrush with soap to scrub away residue, and then dry it thoroughly.
How Do You Clean A Safety Razor After Shaving A Butterfly?
To clean a safety razor after using a butterfly, rinse the razor under warm water and gently shake off excess water.
Conclusion
Maintaining a clean safety razor is essential to ensure the longevity and effectiveness of the tool. By following the steps outlined in this blog post, you can easily keep your safety razor in top condition. Remember to disassemble the razor, clean each component thoroughly, and dry them properly to prevent rusting.
Regular maintenance, such as using a toothbrush to remove debris and regularly changing the blade, will help maintain the efficiency and hygiene of your safety razor. By implementing these cleaning tips, you can enjoy a smooth and precise shave every time while also prolonging the lifespan of your safety razor.
So, take the time to clean your safety razor regularly and enjoy a hassle-free shaving experience.


